Laravel in the past few years became an industry leading solution, if we speak about Web Application written in PHP. No wonder why, it has tons of out of the box solutions. On of the greatest advantage of Laravel is the Authentication Starter Kit, if you want to use the default blade template or Vue. But what should we do if atoms trickle in your veins , and your heart have been stolen by React?
Well, I hope we could find answers for our questions, because in this article we will create a ReactJS Web Application wrapped into Laravel, which is later could became our REST API backend.
After we boot up our new project let’s install the package, which will preset our React frontend:
composer require laravel/uiThen we can run this command:
php artisan ui reactNew files will be added to our project, we should install the npm’s packages:
npm installAs you can see, our webpack.mix.js had been changed, so we could built our React Web App:
mix.js('resources/js/app.js', 'public/js')
    .react()
    .sass('resources/sass/app.scss', 'public/css');
From now your resources > js directory should looks like this:
- resources
- - js
- - - components
- - - - Exmaple.js
- - - app.js
- - - bootstrap.js
Entry point
First of all, we should make a view, what Laravel routing will load and where our JavaScript code will be executed. Create a new view called app.blade.php.
>>> resources/views/app.blade.php
<!DOCTYPE html>
<html lang="{{ str_replace('_', '-', app()->getLocale()) }}">
    <head>
        <meta charset="utf-8">
        <meta name="viewport" content="initial-scale=1, width=device-width"/>
        <title>Laravel & React</title>

    </head>

    <body>
        <div id="app"></div>
        <script src="{{asset('js/app.js')}}"></script>
    </body>

</html>
Create a new file as App.js into resources/js/components directory. This will be our main component.
>>> resources/js/components/App.js

import React from 'react';
import ReactDOM from 'react-dom';

function App() {
    return (
        <div>
            Hello
        </div>
    );
}

export default App;

if (document.getElementById('app')) {
    ReactDOM.render(<App />, document.getElementById('app'));
}
In the app.js file we include our new component.
>>> /resources/js/app.js
/**
 * First we will load all of this project's JavaScript dependencies which
 * includes React and other helpers. It's a great starting point while
 * building robust, powerful web applications using React + Laravel.
 */

require('./bootstrap');

/**
 * Next, we will create a fresh React component instance and attach it to
 * the page. Then, you may begin adding components to this application
 * or customize the JavaScript scaffolding to fit your unique needs.
 */

require('./components/App');
As I mentioned previosuly, Laravel Routing will load our Web App trought the blade view. Here is how we change routing in web.php to do that:
Route::get('/', function () {
return view('app');
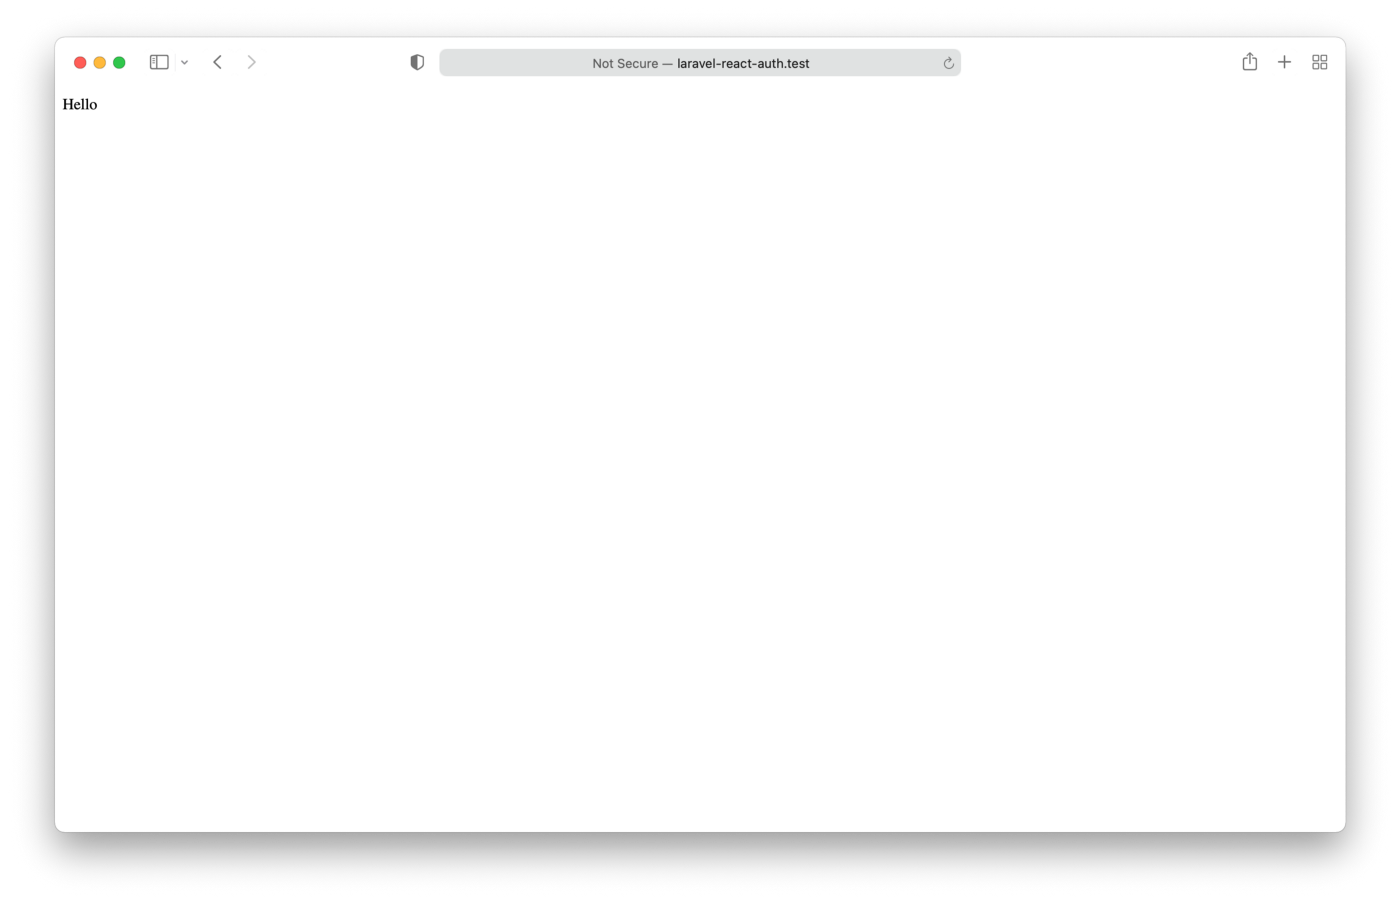
});Finally we could build our web app for the first time.
npm run watchWhen you open your browser you should see something like that:
Laravel Sanctum
Laravel Sanctum is a basic API token based authentication guard. This is the best choice for SPA and mobil application. Let’s install it!
composer require laravel/sanctumPublished the Sanctum’s configuration and migration files.
php artisan vendor:publish --
provider="Laravel\Sanctum\SanctumServiceProvider"
Migrate.
php artisan migrateBecause want to use Sanctum for authentication, we should add Sanctum’s middleware in our api middleware within our app/Http/Kernel.php.
'api' => [
     \Laravel\Sanctum\Http\Middleware\EnsureFrontendRequestsAreStateful::class,
    'throttle:api',
    \Illuminate\Routing\Middleware\SubstituteBindings::class,
],
Login implementation
We are building our authentication method from the skretch, that’s why we should create our own LoginController.
php artisan make:controller LoginControllerWe implement the login attempt in authentication method.
<?php

namespace App\Http\Controllers;

use Illuminate\Http\Request;
use Illuminate\Support\Facades\Auth;

class LoginController extends Controller
{
    public function authenticate(Request $request)
    {
        $credentials = $request->validate([
            'email' => ['required', 'email'],
            'password' => ['required'],
        ]);

        if (Auth::attempt($credentials)) {
            $request->session()->regenerate();
            $user = Auth::user();

            return response()->json($user);
        }

        return response()->json([
            'errors' => [
                'email' => 'The provided credentials do not match our records.',
                ]
        ], 422);
    }
}
Now we can define the new login route.
>>> routes/api.php
use App\Http\Controllers\LoginController;

Route::post('login', [LoginController::class, 'authenticate']);
Login page / Material UI
Material UI is a great UI library. Using this we can make pretty things quite easily. Stop then npm run watch and install the following npm packages:
npm install @mui/material @emotion/react @emotion/styledCreate a new component, this will be our login page:
>>> resources/js/components/Login
import React from "react";
import {
Box,
Button,
Container,
TextField,
CssBaseline,
Typography
} from "@mui/material";
function Login() {
const handleSubmit = (event) => {
//TODO handle form submit
}
return (
<Container maxWidth={"xs"}>
<CssBaseline/>
<Box
sx={{
marginTop: 8,
display: 'flex',
flexDirection: 'column',
alignItems: 'center',
}}>
<Typography component={"h1"} variant={"h5"}>
Login
</Typography>
<Box component={"form"} onSubmit={handleSubmit}>
<TextField
margin="normal"
required
fullWidth
id="email"
label="E-mail"
name="email"
autoComplete="email"
autoFocus
/>
<TextField
margin="normal"
required
fullWidth
name="password"
label="Password"
type="password"
id="password"
autoComplete="current-password"
/>
<Button
fullWidth
variant={"outlined"}
type={"submit"}
sx={{ mt: 3, mb: 2 }}
>
Login
</Button>
</Box>
</Box>
</Container>
)
}
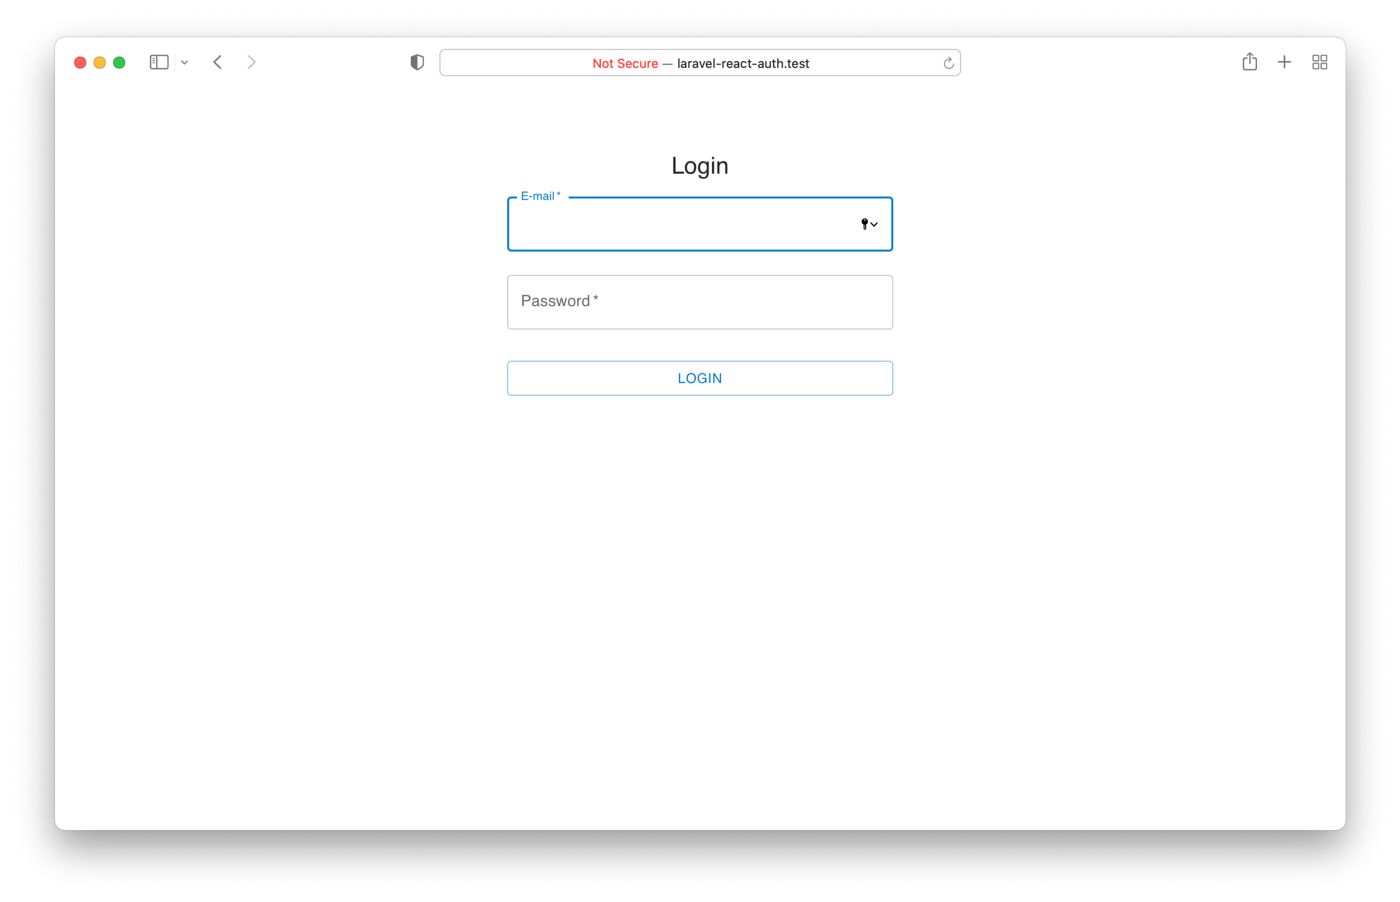
export default LoginIn App.js we can use our new Login page:
import React from 'react';
import ReactDOM from 'react-dom';
import Login from "./Login/Login";

function App() {
    return (
        <React.Fragment>
            <Login/>
        </React.Fragment>
    );
}

export default App;

if (document.getElementById('app')) {
    ReactDOM.render(<App />, document.getElementById('app'));
}
After a fresh built, our app should looks like this:
Create user
Of course, we should’ve some user for login. Now we didn’t want to implement a user creation page, methods, routes etc… We simply use the artisan’s tinker comand. This is a great tool for running php coding in cli.
php artisan tinker
>>> App\Models\User::create([‘name’=> ‘Test User’, ‘email’=> ‘test@test.com’, ‘password’ => bcrypt(‘test’)]);
That’s all, we create our first user!
Handle the submit
We will send our credentials for the backend. If the sign in attempt was successfull, then Laravel will authenticate us using the session cookies.
const handleSubmit = (event) => {
    event.preventDefault()
    const formData = new FormData(event.currentTarget);

    const loginCredentials = {
        email: formData.get('email'),
        password: formData.get('password')
    }

    window.axios.post('/api/login', loginCredentials).then((response) => {
        console.log('Logged successfully!')
    })
}
User Instance
We don’t want to ask our backend for basic information every time we load the page. We could store some variable in the browser’s local storage. For easier access we create a User class, when it’s implemented it will load the data from the storage. After a successful authentication this class will be responsible handle the response’s data, and also has basic method to decied if the user is authenticated.
Create a new file (and directory): resources/js/auth/user.js
class User {

    constructor() {
        this.init()
    }

    init() {
        this.name = localStorage.getItem('userName')
        this.email = localStorage.getItem('userEmail')
        this.loggedIn = localStorage.getItem('userLoggedIn')
    }

    /**
     *
     * @param data object
     * @param data.name string
     * @param data.email string
     * @param callback function
     */
    authenticated(data, callback) {
        localStorage.setItem('userName', data.name)
        localStorage.setItem('userEmail', data.email)
        localStorage.setItem('userLoggedIn', true)

        this.init()

        callback()
    }

    /**
     *
     * @return {boolean}
     */
    isLoggedIn() {
        return Boolean(this.loggedIn) === true
    }
}

export default new User()
Routing
Now we have authenticated user, redirect to somewhere private. Create a component, which one only the logged users will see.
>>> resources/js/components/Dashboard/Dashboard.js
import React from "react";
import user from "../../Models/user";
import {Container, Grid, Paper, Typography} from "@mui/material";

function Dashboard() {
    return (
        <React.Fragment>
            <Container>
                <Grid container justifyContent={"center"}>
                    <Grid item md={12}>
                        <Typography variant={"h5"}>
                            Hello {user.name}, you're logged in!
                        </Typography>
                    </Grid>
                </Grid>
            </Container>
        </React.Fragment>
    )
}

export default Dashboard
React Router
We are going to use the React Router library for client-side routing.
npm install react-router-domProtected Route
In default, React Router package doesn’t support authenticated routes handling. We should implement this logic.
We create a new component called ProtectedRoute. This return with a Route component. The authentication is in the render method. We check if the user is logged in, if it’s fullfiled the original component (which is passed by as prop) will be render, if not we redirect to login page.
>>> resources/js/components/ProtectedRoute/ProtectedRoute.js
import React from "react";
import {Redirect, Route} from "react-router-dom";
import user from "../../Models/user";

export const ProtectedRoute = ({component: Component, ...rest}) => {
    return (
        <Route {...rest}
               render={
                   (props) => {
                       if (user.isLoggedIn()) {
                           return <Component {...props} {...rest}/>
                       }
                       return <Redirect to={{
                           pathname: "/app/login",
                           state: { from: props.location }
                       }}/>
                   }
               }
        />
    )
}
Now we define our routes: the simple and the protected.
>>> resources/js/components/App.js
function App() {
    return (
        <React.Fragment>
            <BrowserRouter>
                <Route path={'/app/login'}>
                    <Login/>
                </Route>
                <ProtectedRoute
                    exact path={'/app/dashboard'}
                    component={Dashboard}
                />
            </BrowserRouter>
        </React.Fragment>
    );
}
As you can see, our ProtectedRoute works as the same as Route. We can pass exactly the same props.
In the Login component we call the authentication method of the User class. After a successful login the callback function will redirect the user to the protected route. We use the withRouter() to pass the history and location props to the Login componenets.
>>> resources/js/componenets/Login/Login.js
import React from "react";
import {
    Box,
    Button,
    Container,
    TextField,
    CssBaseline,
    Typography
} from "@mui/material";
import user from "../../Models/user";
import {withRouter} from "react-router-dom";

function Login({history, location}) {

    const handleSubmit = (event) => {
        event.preventDefault()
        const formData = new FormData(event.currentTarget);

        const loginCredentials = {
            email: formData.get('email'),
            password: formData.get('password')
        }

        function authenticatedCallback() {
            let {from} = location.state || {from: {pathname: '/'}}
            history.replace(from)
        }

        window.axios.post('/api/login', loginCredentials).then((response) => {
            user.authenticated(response.data, authenticatedCallback)
        })
    }

    return (
        <Container maxWidth={"xs"}>
            <CssBaseline/>
            <Box
                sx={{
                    marginTop: 8,
                    display: 'flex',
                    flexDirection: 'column',
                    alignItems: 'center',
                }}>
                <Typography component={"h1"} variant={"h5"}>
                    Login
                </Typography>
                <Box component={"form"} onSubmit={handleSubmit}>
                    <TextField
                        margin="normal"
                        required
                        fullWidth
                        id="email"
                        label="E-mail"
                        name="email"
                        autoComplete="email"
                        autoFocus
                    />
                    <TextField
                        margin="normal"
                        required
                        fullWidth
                        name="password"
                        label="Password"
                        type="password"
                        id="password"
                        autoComplete="current-password"
                    />
                    <Button
                        fullWidth
                        variant={"outlined"}
                        type={"submit"}
                        sx={{mt: 3, mb: 2}}
                    >
                        Login
                    </Button>
                </Box>
            </Box>
        </Container>
    )
}

export default withRouter(Login)
We have one missing point in our routing system. Now Laravel only redirects to React web app when the url pattern is matched to domain.com/app. We should add one more param to handle routes like app/login, app/dashboards, etc.
>>> routes/web.php
<?php
use Illuminate\Support\Facades\Route;
Route::get('/', function () {
return redirect('/app/dashboard');
});
Route::get('/app/{path?}', function () {
return view('app');
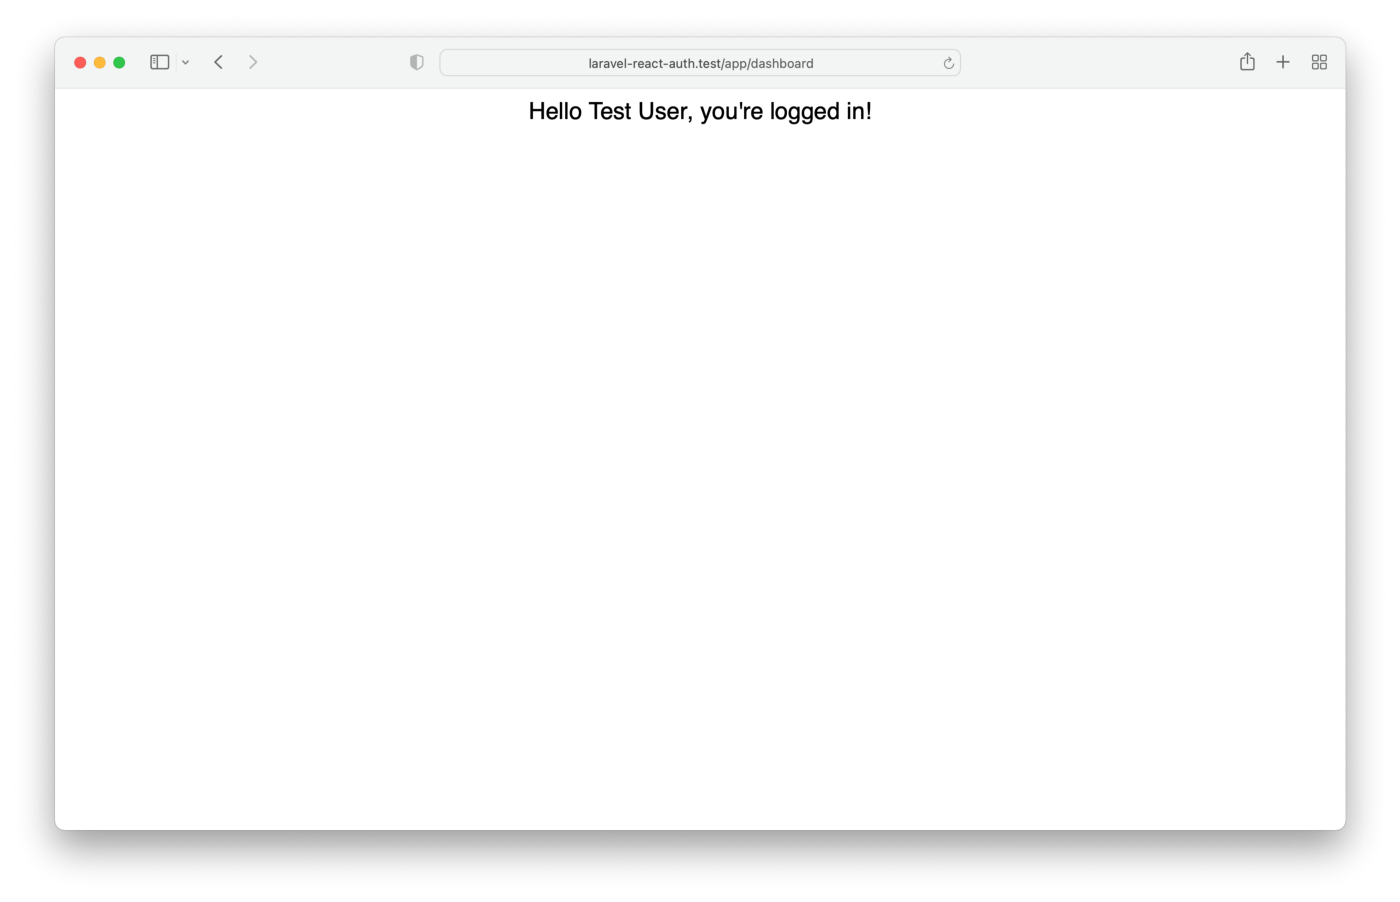
});On your browser got to the /auth/login page and try to log in with the user, which we created previously.
Finally we are logged in!
We also published the working solution to GitHub. In the next chapter we cover how to sign out correctly from our freshly created web application! For more similar professional writings, read our other blog posts!
The original version of the article is available here.