In our previous article - First steps - we've already discussed shaders, and now it's time to explore how we can create shaders using newer, visual tools! For the sake of simplicity, we will use Unity's own widely available node-based visual graph editor, Shader Graph. We will delve into sub-graphs, custom scripts, and how to transform code-based shaders into graphs.
Why bother with Shader Graph? If you haven't written your own shaders before, the syntax, processes, and methods can be daunting at first. Working with visual graphs is simpler and much more user-friendly. It incorporates features like built-in noise nodes (normal and Gauss). However, graphs and code are not mutually exclusive; you can write your code using the "Custom function" node.
Shader Graph
Shader Graph has been available in Scriptable Render Pipelines (SRP) for a long time (URP, HDRP) since version 2021.1, and can also be used in the Built-In pipeline. If you are using one of the SRPs, the package is automatically installed when creating a new project. However, in the Built-In pipeline, Shader Graph is only supported for compatibility, with no new features added. Therefore, this article uses Unity 2022.3f and the URP version.
Creating a shader graph is similar to creating a shader asset: Right-click in the project folder → Create → Shader Graph → URP. Here, you can choose the type that suits your needs. If your requirements change during development, such as starting with an unlit shader but wanting to create a lit shader later, you can adjust its properties in the Graph Settings. This will give you a .shadergraph file.
After opening your graph, you'll find the "Blackboard" on the left. Here, like with shader assets, you can define public variables, categories, and keywords. Keywords work here just like in shader code; you can specify how the shader should behave under different graphical settings. In addition, using categories can help organise your variables. You can add them to the graph with the drag-and-drop method from this table.
On the right side, you'll find the Graph Inspector. In the ‘Graph Settings’ section, you can configure settings for the entire graph. In the Node Settings tab, you can access precise and preview information on various nodes and customize variables.
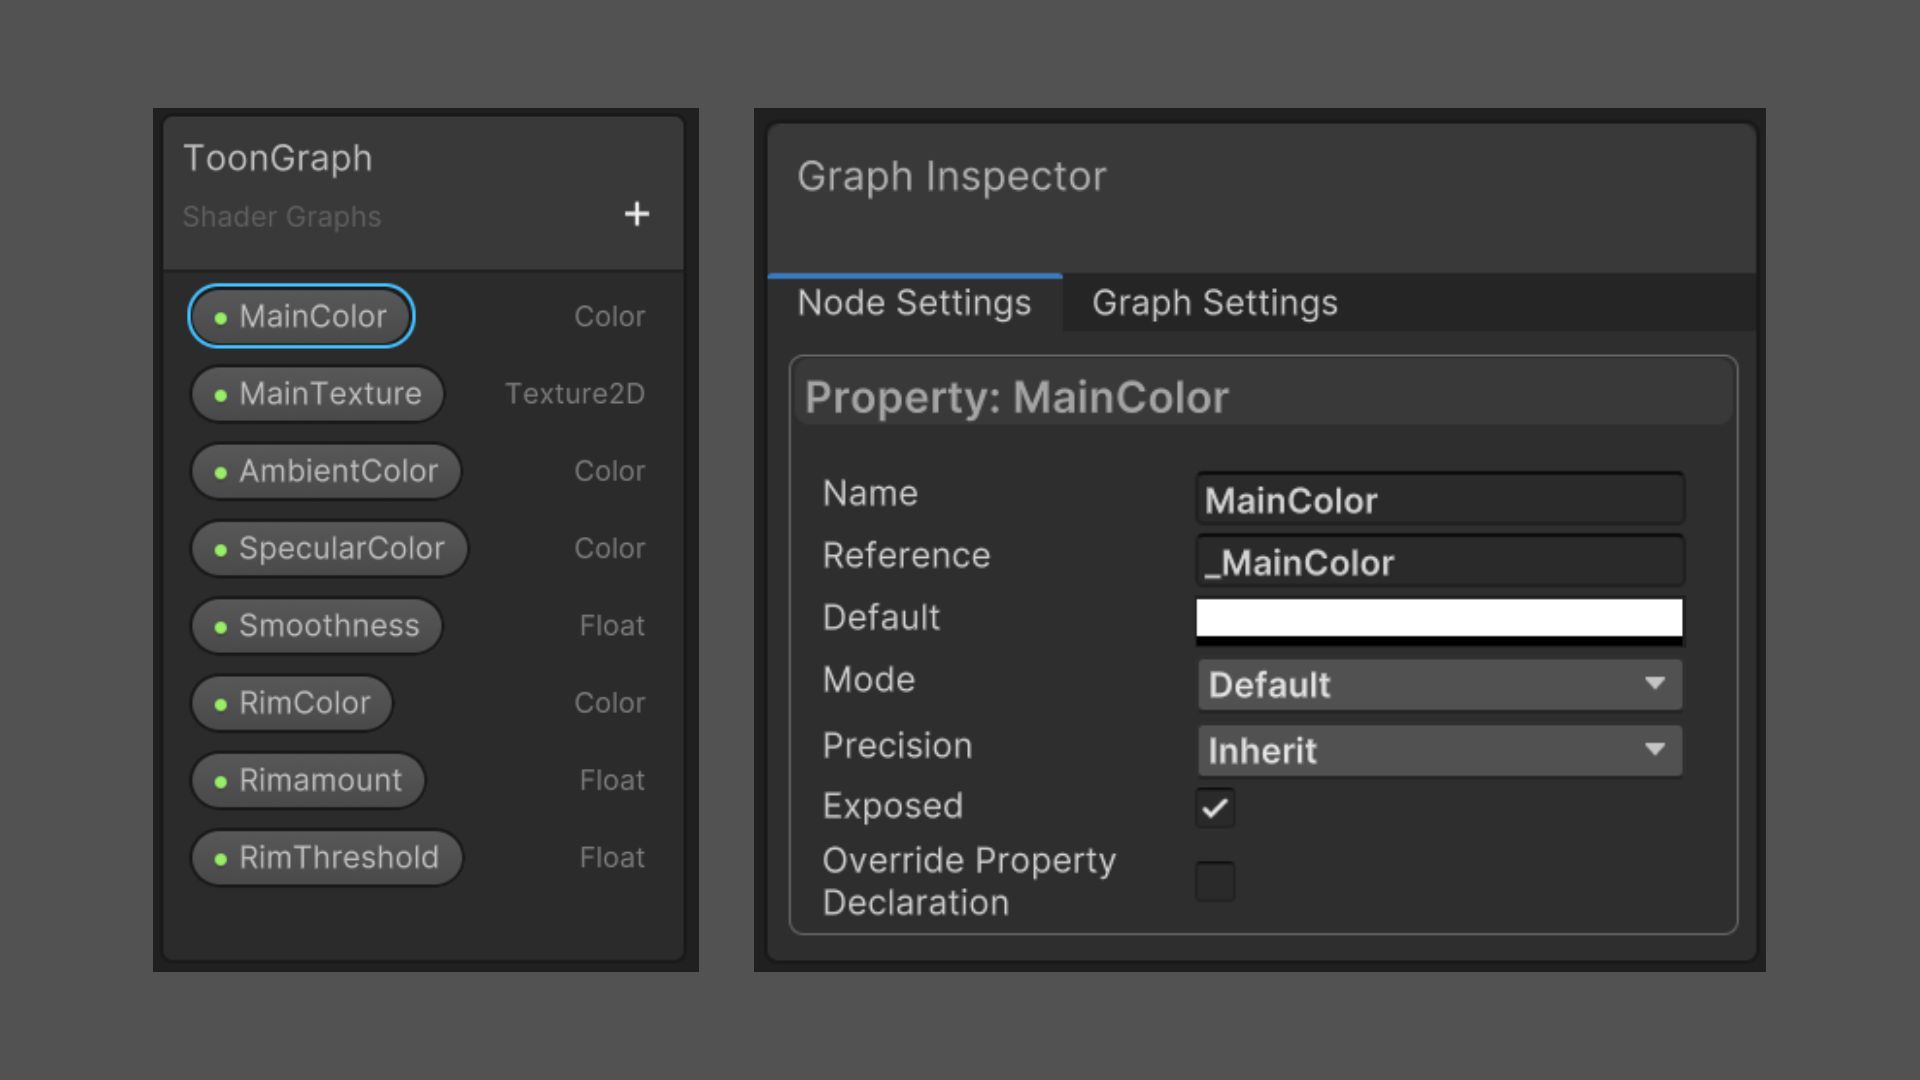
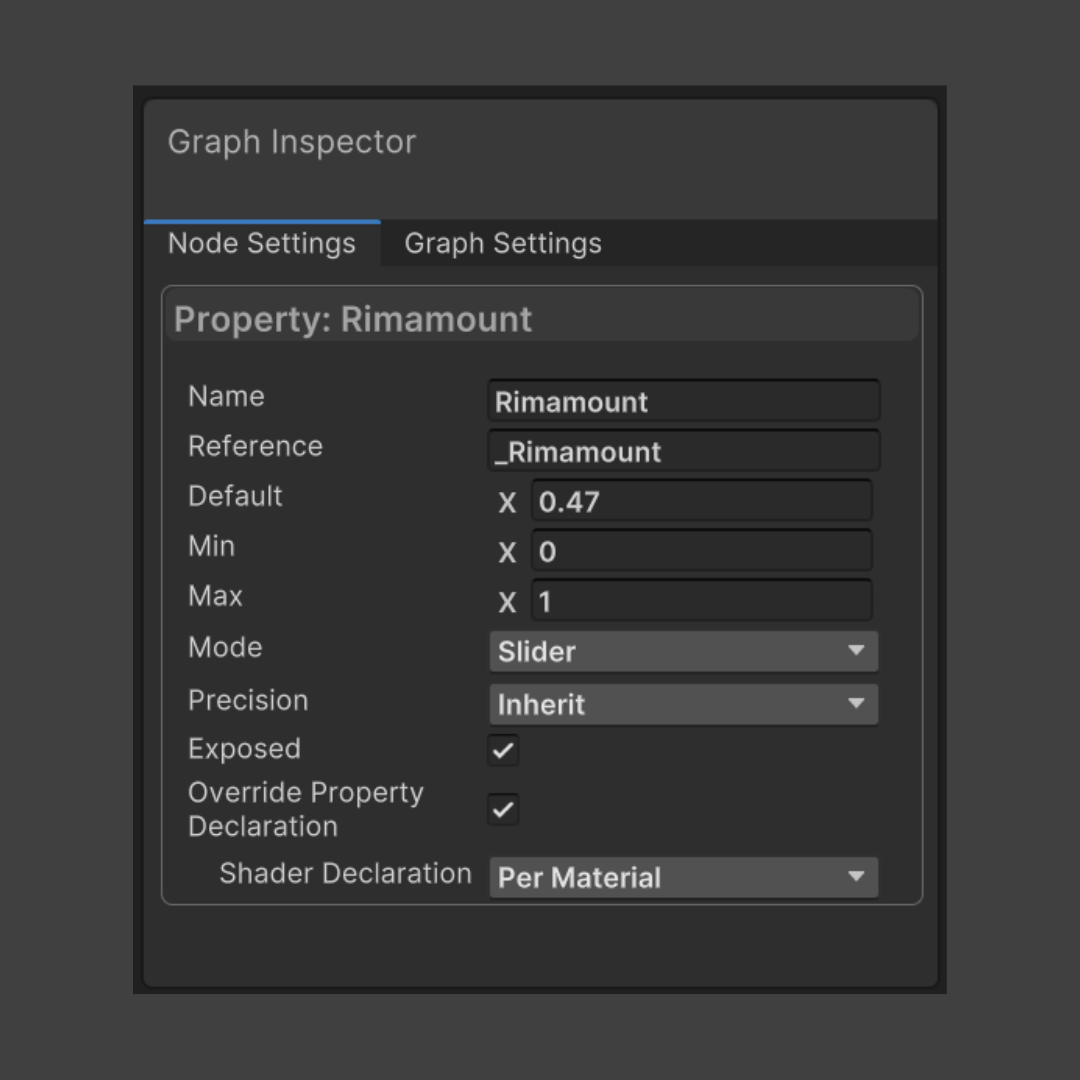
For example, if you want to create a slider, you must first add a float variable by clicking the "+" button. Then, in the Node Settings tab, choose "Slider" as the Mode and specify the minimum, maximum, and default values. The "Exposed" checkbox determines whether the variable is visible in the Inspector. If it's not checked, you can only set its value through code.
Sub-graphs and custom functions
Sub-graphs help with reusability and clarity. You can create them similarly to .shadergraph files, but you need to choose the Sub-graph option instead of Shader Graph.
When you open the previously created .shadersubgraph, you'll notice it contains only one node called Output. By clicking on it in the Inspector Node Settings, you can define one or more inputs. These values can be used elsewhere in your graph.
The "Custom function" node allows you to insert your custom HLSL code into the graph. You can either directly write the code using the "string" mode or provide a pre-made solution as a reference. However, you need to specify the inputs and outputs yourself.
Now, let's start modifying our previous toon shader!
Based on the above, create an unlit shader graph asset and a sub-shader asset named "MainLight." You can prepare variables in the shader graph, but for now, let's work inside the MainLight sub-shader.
Let's examine the code from the previous blog post for a moment. We use the NDotL and NDotH variables multiple times. We definitely need the _WorldSpaceLightPos0, _LightColor0, and SHADOW_ATTENUATION(i) values. How do we access helper variables stored in AutoLight.cginc and Lightning .cginc?
While there isn't a ready-made node for this (although from version 2022.1, the Main Light direction is available), we can use custom code with the "Custom function" node. You can find HLSL code available online for various lighting calculations, or you can write your own if the situation demands it. In this case, for simplicity, we'll use the code from Unity's example project. Download and add it to your project.
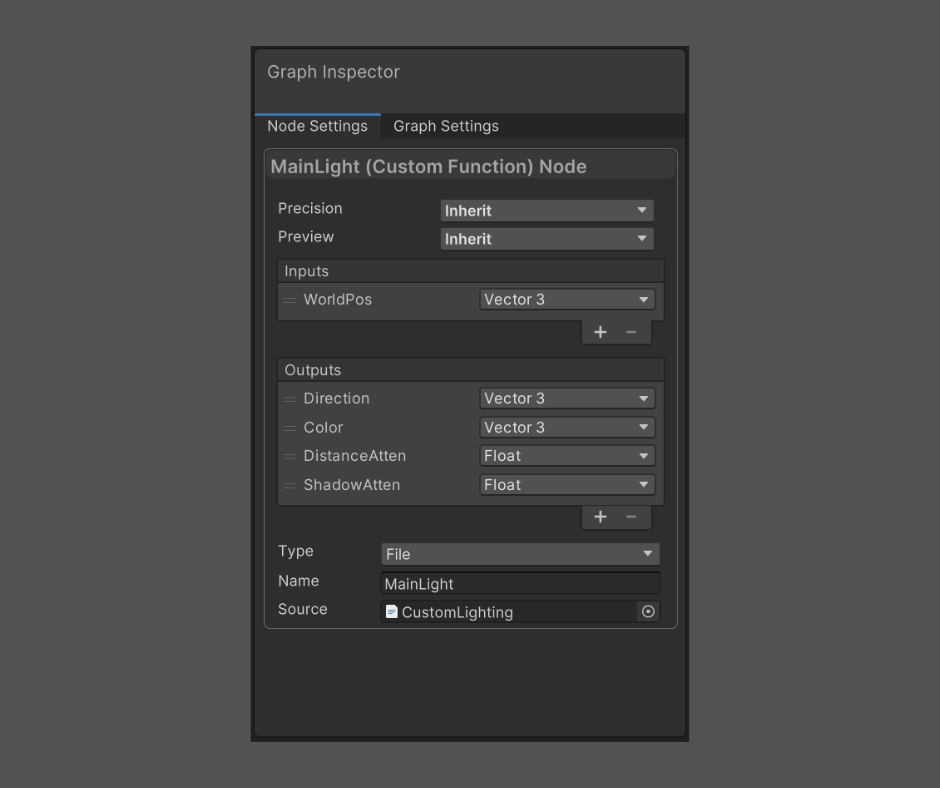
Open the subgraph and add the Custom Function node. If you examine the code, you'll notice several functions. We'll use MainLight_float() for now, and we can use AdditionalLights later to make our shader use sources other than directional light.
Pay attention to the parameters of MainLight: one input and three outputs. Configure the Custom Function accordingly. Ensure that you specify the variable types in the correct order. Only the function name is needed for "Name"; you don’t have to be precise.
With this, we have all the important variables we need to create the shader. Fortunately, the Normal Vector (worldNormal) and View Direction (viewDir) are available as built-in nodes. Following the code, let's create the NDotL and NDotH variables.
The used lines are as follows:
float3 normal = normalize(i.worldNormal);
float NdotL = dot(_WorldSpaceLightPos0, normal);
float shadow = SHADOW_ATTENUATION(i);
float3 viewDir = normalize(i.viewDir);
float3 halfVector = normalize(_WorldSpaceLightPos0 + viewDir);
float NdotH = dot(normal, halfVector);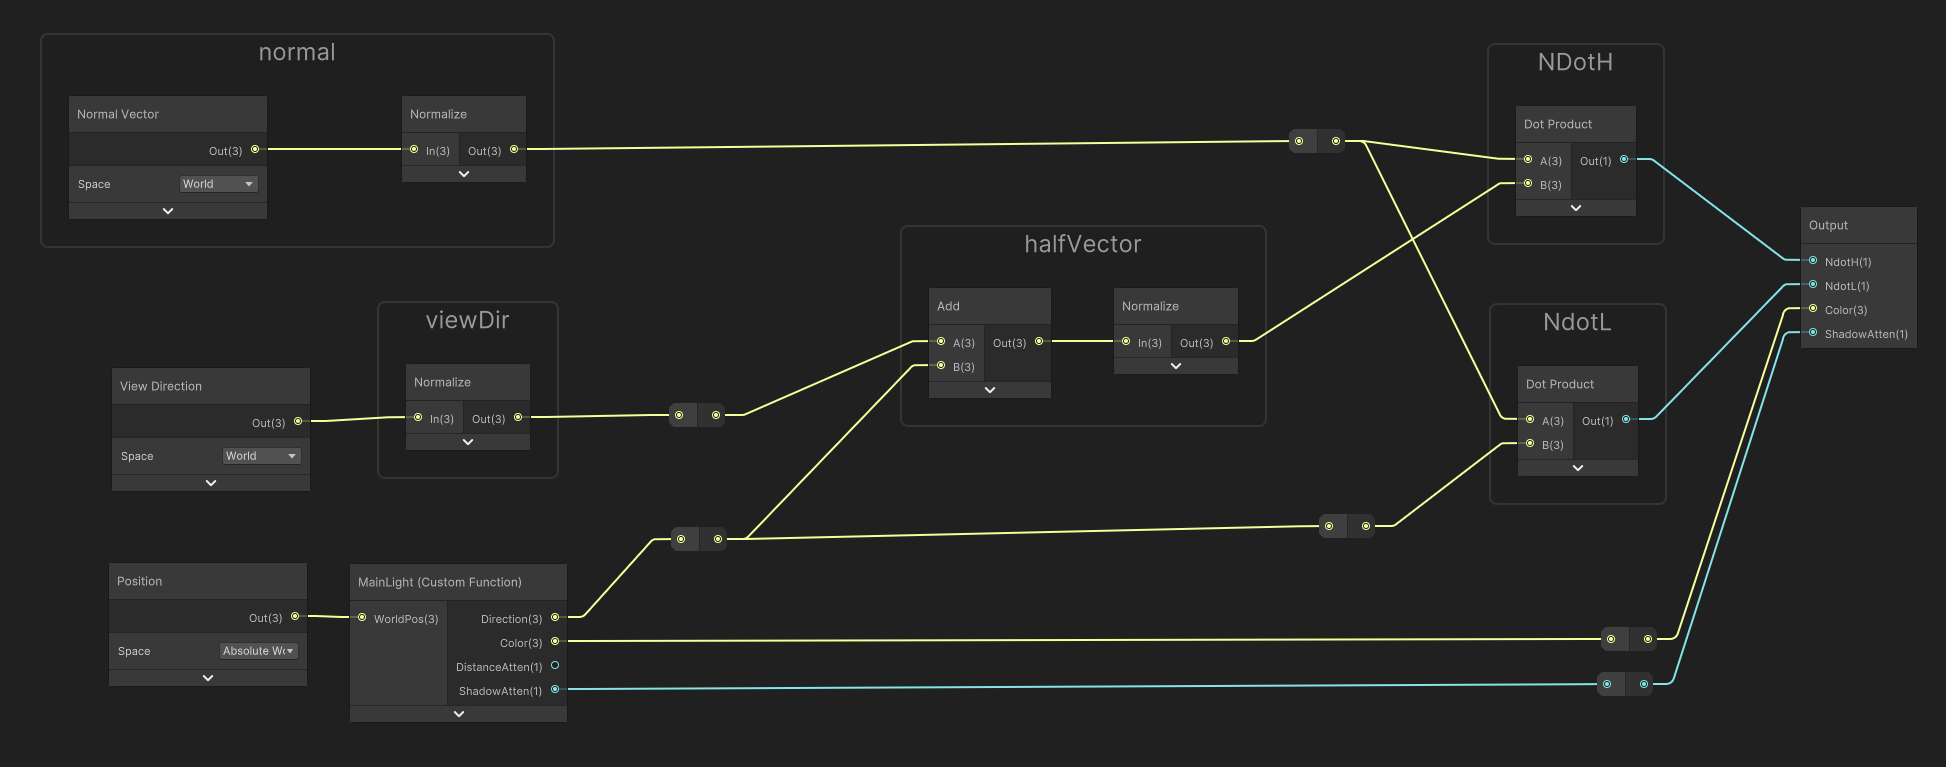
Add the outputs of our custom function to the subgraph's output node, ensuring the correct types and precision (you can omit DistanceAttenuation as we won't need it going forward), and connect NDotL and NDotH to it.
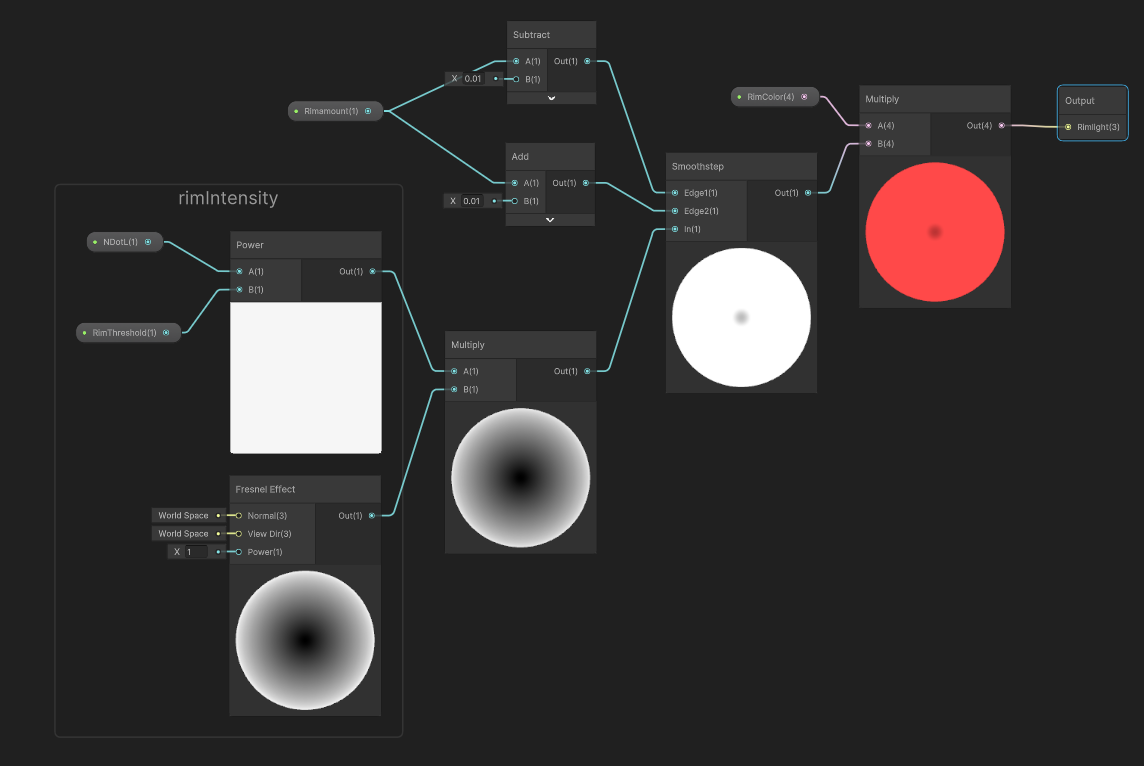
Since rim lighting involves several operations, it's a good idea to encapsulate it in a subgraph. You can see that we only use the rim variable at the end, so we only need to provide one output. The graph will differ from the previous one in that it will require inputs (NDotL, RimColor, RimThreshold, RimAmount). Even if you've already created them in your main graph, you'll need to do it again in the sub-shader. You can modify the shader by using a Fresnel Effect node instead of 1 - dot(viewDir, normal).
The used lines are as follows:
float4 rimDot = 1 - dot(viewDir, normal);
float rimIntensity = rimDot * pow(NdotL, _RimThreshold);
rimIntensity = smoothstep(_RimAmount - 0.01, _RimAmount + 0.01, rimIntensity);
float4 rim = rimIntensity * _RimColor;
With these subshaders operations completed, we can return to our main graph. If we've done everything correctly, the following operations need to be implemented:
float lightIntensity = smoothstep(0, 0.01, NdotL * shadow);
float4 light = lightIntensity * _LightColor0;
float specularIntensity = pow(NdotH * lightIntensity, _Glossiness * _Glossiness);
float specularIntensitySmooth = smoothstep(0.005, 0.01, specularIntensity);
float4 specular = specularIntensitySmooth * _SpecularColor;
float4 sample = tex2D(_MainTex, i.uv);
At the end, we connect the following to the Base Color output:
(light + _AmbientColor + specular + rim) * _Color * sample;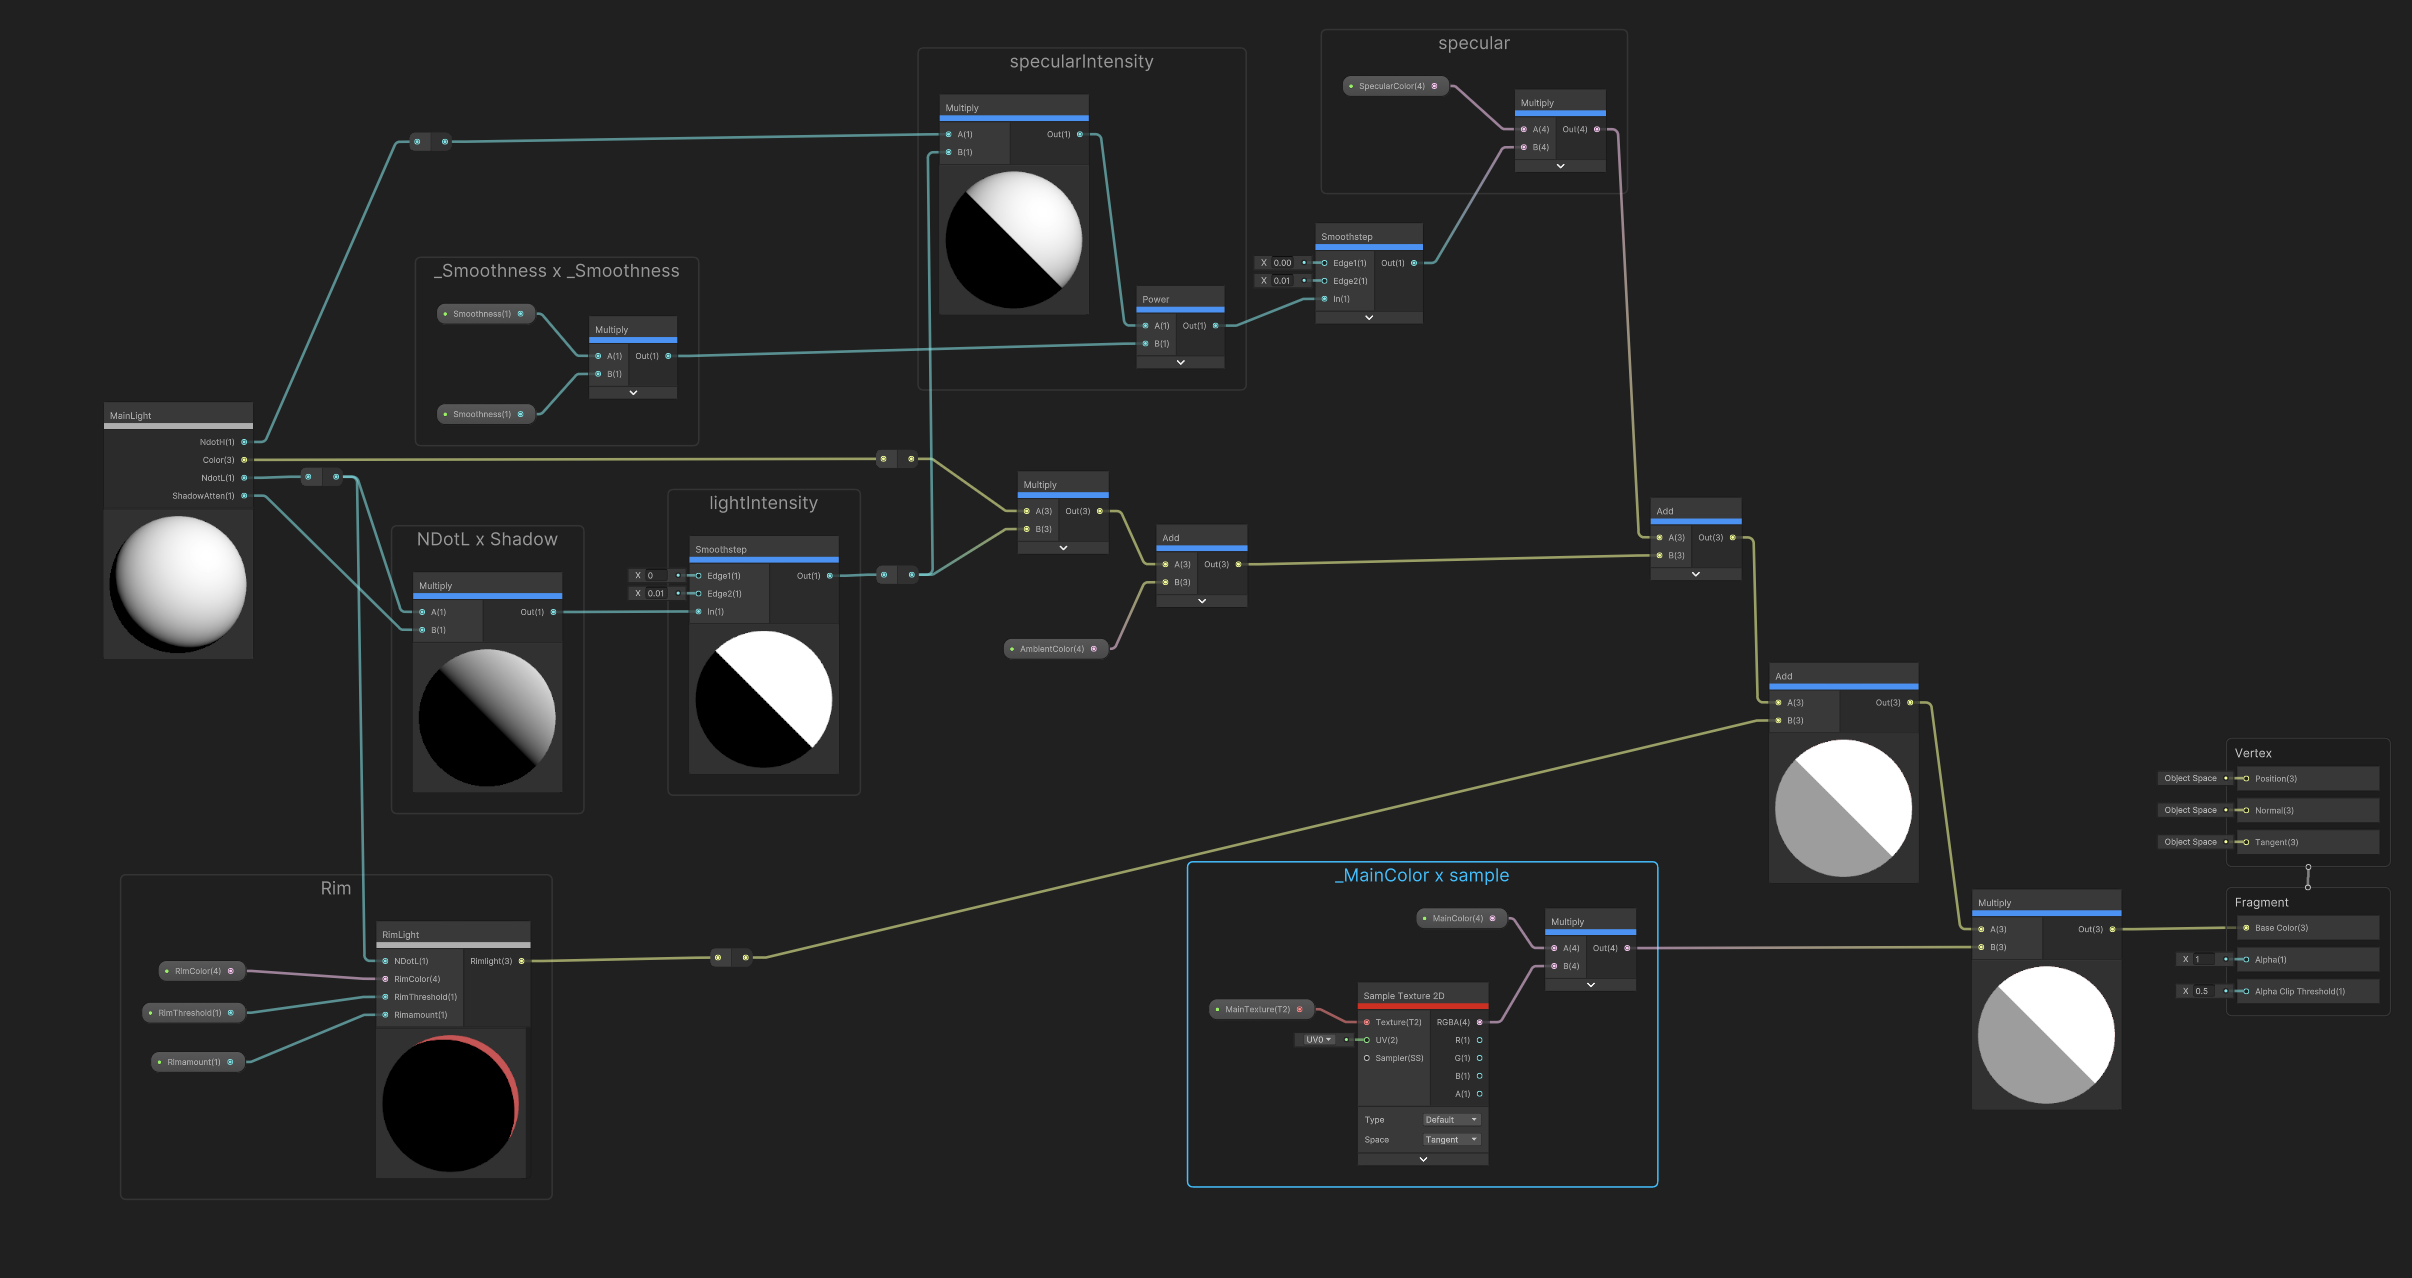
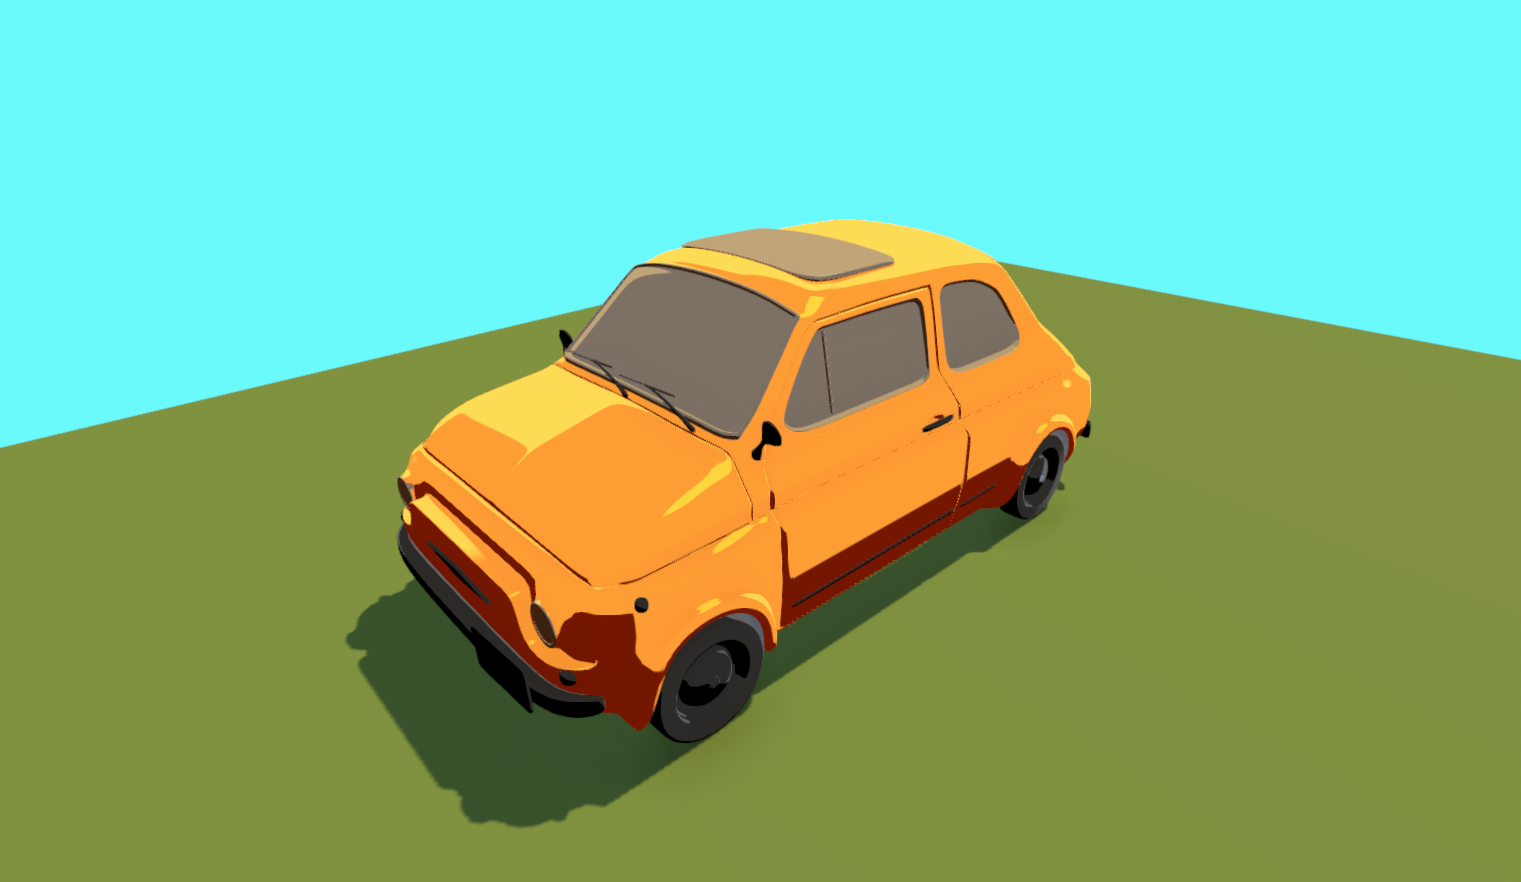
For easier readability, I've organized the nodes into groups by variable names. As you can see, even though this isn't a complex graph, organizing it into subgraphs has improved readability, which will be useful for debugging and verification later on.
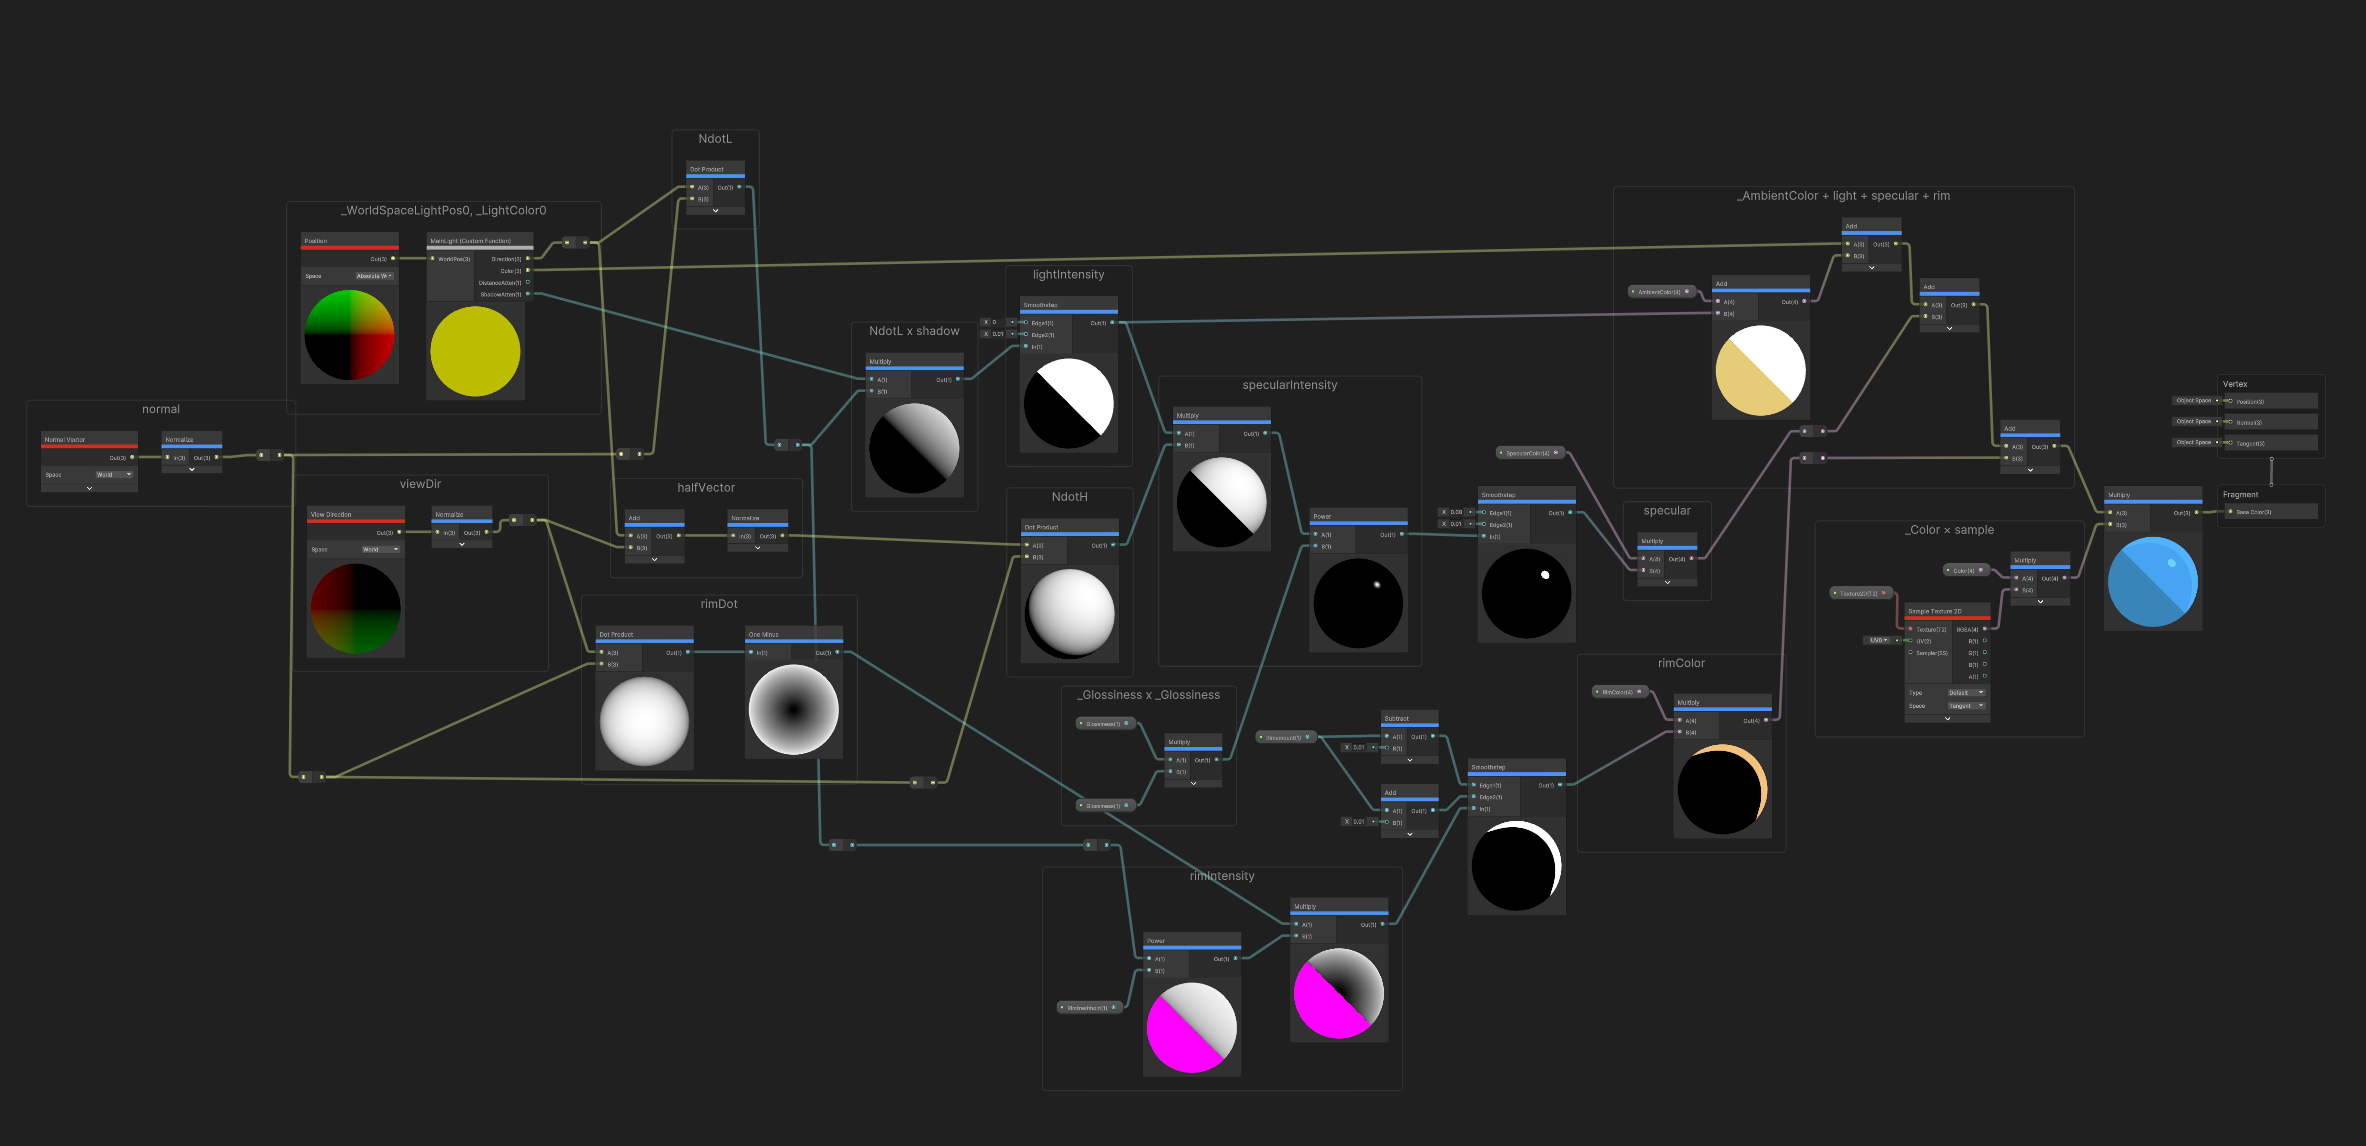
As an interesting note, the image below shows how the shader would have looked without subgraphs and without any modifications:
If you have any more specific questions or need further assistance, feel free to ask!
This article was written by M. Tamara and translated by F. Flóra.